RADIUS Clients
Warning
Mideye Server 4 is no longer updated, and new installations are not supported. Only existing Mideye Server 4 installations and upgrades to latest release are supported. Please use Mideye Server 6 for new installations and continued support.
RADIUS Clients Configuration
To create a new RADIUS Client, open “Configuration Tool” and navigate to RADIUS clients. Click “New”
Client properties
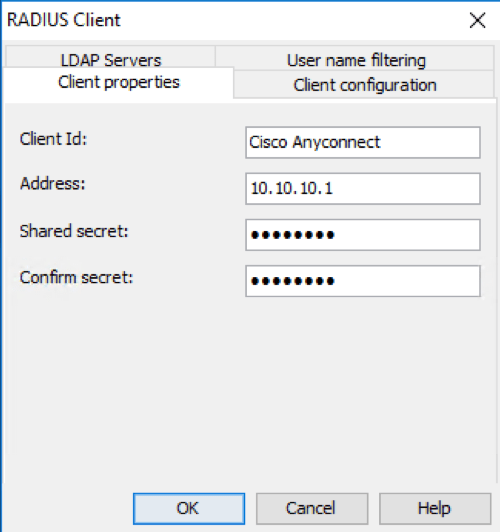
Give the RADIUS-client a friendly name and enter the IP address or the hostname of the RADIUS-client. Enter the shared secret twice. The shared secret must match the RADIUS client (VPN-concentrator, access-portal etc.)
RADIUS client configuration

LDAP Servers
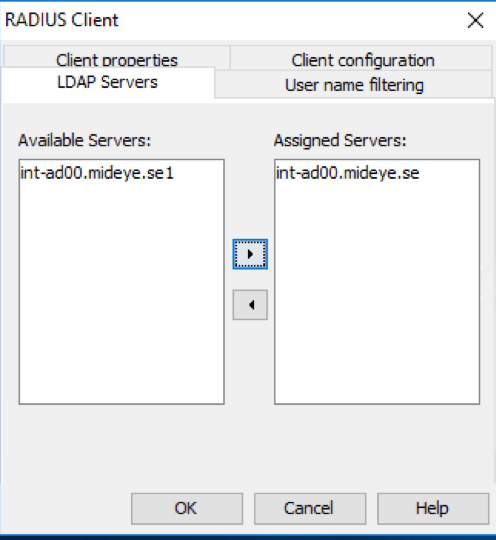
Navigate to LDAP Servers and select the LDAP server that should be in use and move it to the “Assigned Servers”. Multiple LDAP servers can be assigned, and Mideye Server will start searching from top to bottom. If the user is found in the first LDAP server and two servers are populated in the Assigned Server, Mideye will not continue in the second LDAP server.
Select LDAP server

RADIUS client configuration
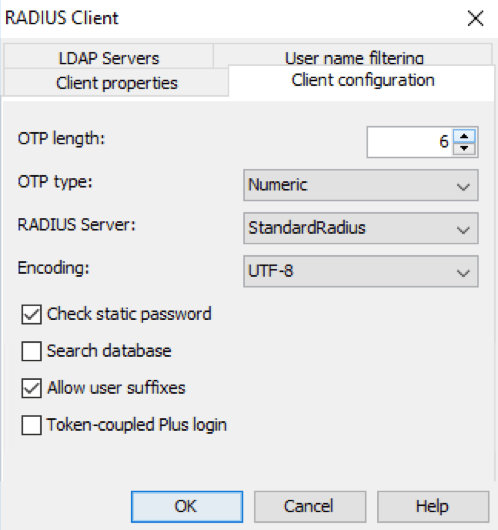
OTP Length: Default value of the OTP length is 6, but it can be customised to a minimum of 4 and a maximum of 12. OTP Type: Default all OTP will be numeric, but can be customised to numeric, alphabetic and Alphanumeric. RADIUS Server: Assign what RADIUS server that should be used by the client. Encoding: Assign the appropriate encoding for the RADIUS client. Default value is UTF-8.
Check Static Password: Enabled by default, but can be disabled if Mideye should ignore the password sent by the enduser. If ignored, be advised that only the correct username is needed for a successful authentication. Search Database: Except for LDAP, Mideye Server can perform a search from its own database. When enabled, Mideye Server will always start searching for users in the database before moving on to LDAP. Allow user suffix: Enable if Mideye should enable user-selected authentication types. Token-coupled Plus login: Enable to only accept login with token-coupled Mideye+ apps or token cards.
Client configuration

User name filtering
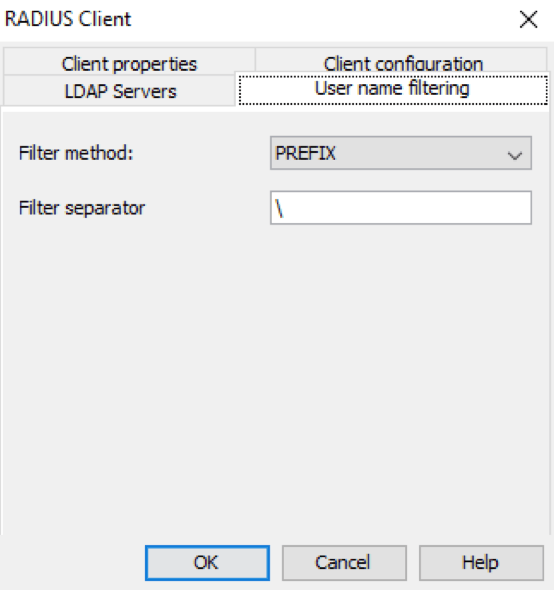
Mideye can filter part of the username sent from the RADIUS client. Choose filter method and add a filter separator. Username filtering will only function with authentication type PAP.
In this example, everything before will be removed by Mideye Server

Verify RADIUS client
In order to verify that the created RADIUS client is working, perform a authentication attempt from the RADIUS-client using Mideye two-factor authentication.
Troubleshooting RADIUS client
RADIUS timeout
Mideye Server require a RADIUS timeout that is at least 35 seconds to function correctly. The timeout can be verified in two ways:
- Install and activate Mideye+ using Touch Accept. When logging in, wait with pressing the “Accept” button until it is only 1-2 seconds left. Make sure the login is successful.
- Create a test-user and add the phone number +46763361379 to the user. OTP deliveries are delayed for this number, and the OTP prompt should appear after approximately 28-30 seconds. If the OTP prompt is displayed, it is verified that the RADIUS timeout is sufficient to handle mobile network problems and compatibility with Mideye+. If no OTP prompt is displayed, troubleshoot the timeout of the RADIUS-client.
No response from Mideye Server
Make sure that no firewall is blocking udp/1812 (default). If Mideye Server is installed on a windows platform with the builtin firewall enabled, create a firewall rule allowing incoming RADIUS traffic.
Invalid user or password
If all authentication attempts results in a “Invalid user or password” the shared secret between the Mideye Server and the RADIUS client most likely differs. Make sure that the shared secret is exactly the same on both the RADIUS server and the RADIUS client.
Check radius-messages.log
The radius-messages.log file can be viewed from Mideye Web Admin or from the log directory of the Mideye installation. This file will log all authentication attempt to the Mideye Server.