Load Balancing
To achieve high availability for Mideye Server 6, implementing load balancing with multiple Mideye servers is recommended. This guide uses Citrix NetScaler ADC as an example for configuration. The setup process is similar for other load balancers.
Prerequisites
- Citrix NetScaler ADC: Ensure you have administrative access to the NetScaler ADC.
- Multiple Mideye Servers: At least two Mideye Server instances configured and running.
- RADIUS Shared Secret: A shared secret configured on both the NetScaler and Mideye Servers.
- Network Configuration: Ensure network connectivity between NetScaler, Mideye Servers, and RADIUS clients.
Key Considerations
- Persistent Connections: Mideye Server cannot handle RADIUS Challenge-Response messages sent to a server that did not initiate them. Enable persistent connections to ensure consistent routing.
- RADIUS Shared Secret: The source IP of the load balancer must be used as the RADIUS shared secret.
- Traffic Routing: When traffic passes through the load balancer, Mideye Server will return traffic directly to the RADIUS Concentrator (RADIUS Client). The RADIUS Concentrator expects packets from the load balancer's IP, not the individual Mideye Servers.
NetScaler ADC Configuration Steps
1. Enable Load Balancing Feature
-
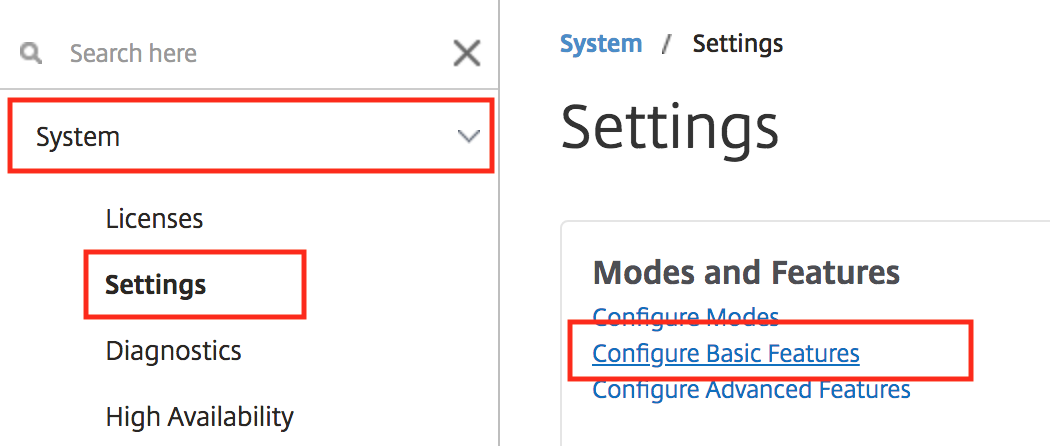
Navigate to Basic Features:
-
In the NetScaler management console, go to System → Settings → Configure Basic Features.
-
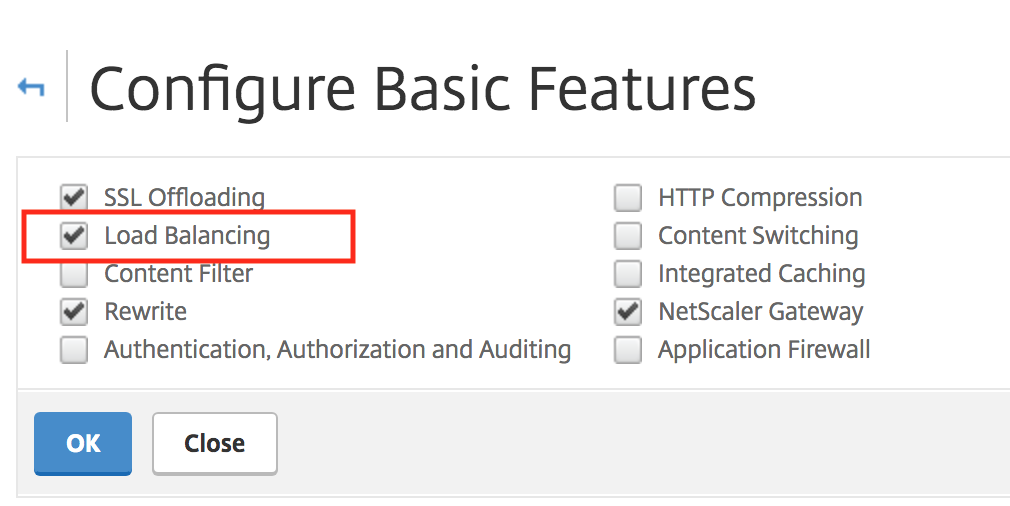
Enable Load Balancing:
-
In the Basic Features section, select Load Balancing.
-
Click OK to enable the feature.
2. Create Server Objects
Each Mideye RADIUS Server requires a corresponding server object in NetScaler.
-
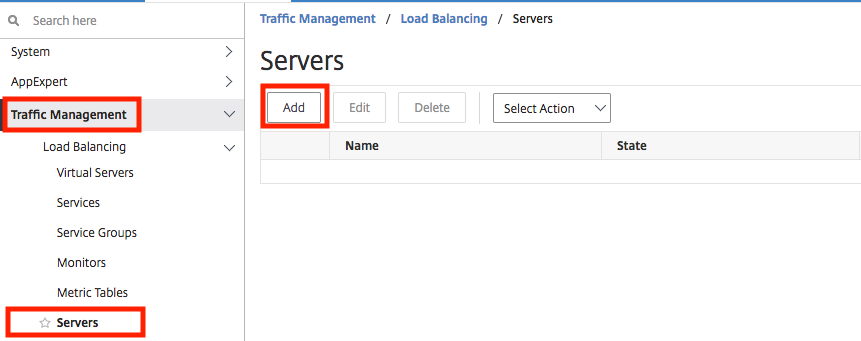
Navigate to Servers:
-
Go to Traffic Management → Load Balancing → Servers.
-
Add a New Server:
-
Click the Add button.
-
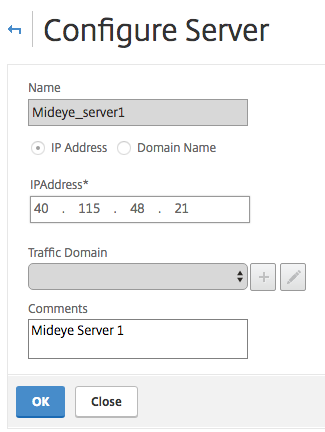
Enter the following details for each Mideye server:
- Name:
Mideye_Server1 - IP Address:
172.16.0.100
- Name:
-
Click Create.
-
Repeat this process for additional Mideye Servers as needed.
3. Configure Load Balancing RADIUS Servers
-
Navigate to Services:
-
Go to Traffic Management → Load Balancing → Services.

-
Add a New Service:
-
Click the Add button.
-
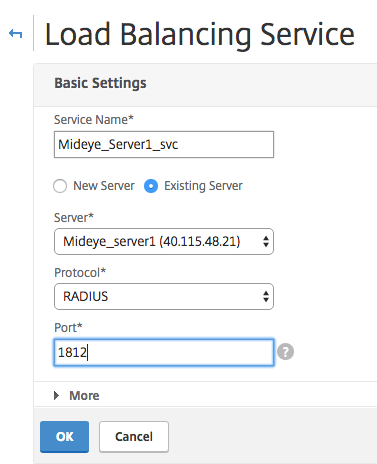
Configure the service with the following settings:
- Service Name:
Mideye_Server1_svc - Server: Select the previously created server object (
Mideye_Server1). - Protocol:
RADIUS - Port:
1812
- Service Name:
-
Click Done to create the service.
-
Repeat this process for each Mideye Server.
4. Add a Monitor to the Load Balancing Service
A monitor ensures that the Mideye Server services are responsive and operational.
-
Navigate to Services:
-
Go to Traffic Management → Load Balancing → Services.
-
Edit the Desired Service:
-
Select the service you want to monitor (e.g.,
Mideye_Server1_svc). -
Click Edit.
-
Add the Monitor:
-
Scroll to the Monitor section at the bottom of the service configuration page.
-
Click Add to bind a monitor to the service.

-
Configure the Monitor:
-
Remove the default
pingmonitor binding.
-
Add the previously created
Mideye_RADIUSmonitor. - Click Close to finalize the binding.
-
Click Done to save the changes.

-
Verify Monitor Status:
-
Ensure that both service states are marked as UP, indicating that the monitors are active and RADIUS traffic is reaching the Mideye Servers.

-
Check Monitor Logs on Mideye Server:
-
Verify that the Mideye Server logs show entries similar to the following, indicating successful monitor interactions:
Adding a Monitor to the Load Balancing Service
A monitor checks if the Mideye Server service is responding correctly. The monitor needs to authenticate to the Mideye Service or check the Health API. The monitor service verifies the response codes sent from the Mideye Server. These checks do not monitor the communication between Mideye Server and Mideye Switch.
Monitor Response Codes
- Access Accept (0):
The test user has access to the authenticated RADIUS server.
- Access Reject (1):
The test user exists but is rejected by the RADIUS Server.
- Access Reject (3):
Internal Error. Account does not exist or wrong password.
Creating a Virtual Server
Setting up a virtual server allows NetScaler to handle and distribute RADIUS traffic effectively.
-
Navigate to Virtual Servers:
-
In the NetScaler management console, go to Traffic Management → Load Balancing → Virtual Servers.

-
Add a New Virtual Server:
-
Click the Add button to create a new virtual server.
-
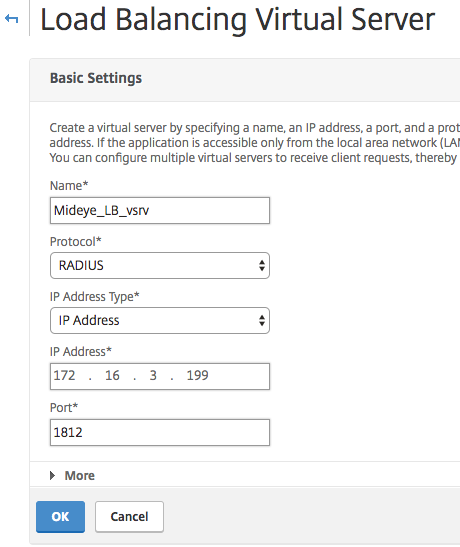
Configure the virtual server with the following settings:
- Name:
Mideye_LB_vsrv - Protocol:
RADIUS - IP Address Type:
IP IPAddress - IP Address: (Enter the desired IP address for the virtual server)
- Port:
1812
- Name:
-
Finalize Virtual Server Creation:
-
Review the settings to ensure accuracy.
- Click Create to add the virtual server to the load balancing configuration.
1. Create a Monitor
To effectively monitor the RADIUS traffic and ensure the reliability of your Mideye Servers, follow these steps to create a monitor:
-
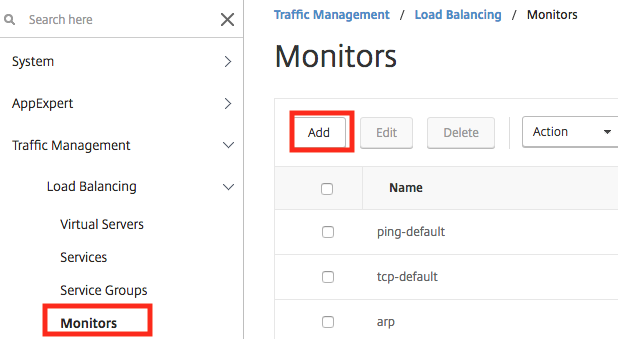
Navigate to Monitors
-
In the NetScaler management console, go to Traffic Management → Load Balancing → Monitors.
-
Add a New Monitor
-
Click the Add button to create a new monitor.
-
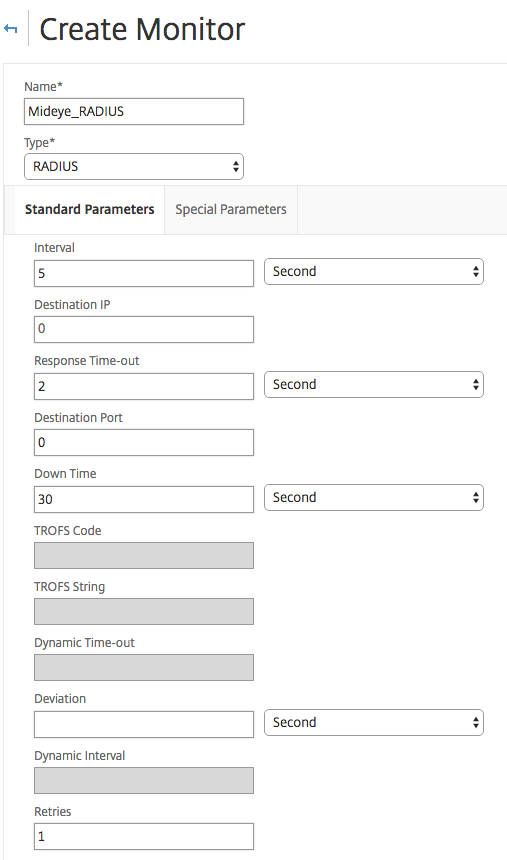
Configure the monitor with the following settings:
- Name:
Mideye_RADIUS - Type:
Radius - Destination IP:
0
(This setting allows the monitor to use the IP from the bound service.) - Destination Port:
0
(This setting allows the monitor to use the port from the bound service.) - Retries:
1
- Name:
-
Configure Special Parameters
-
Select the Special Parameters tab.
-
Modify the response codes and authentication details:
- Remove response code
2(default). - Add response code
3. - Username: Enter a fake username.
(This will appear in the Mideye Server logs for monitoring purposes.) - Password: Enter a fake password.
- Shared Secret: Enter the shared secret for the RADIUS client that the monitor will test.
Ensure this shared secret is also configured on the Mideye Server as it acts as a legitimate RADIUS client attempting to authenticate.
- Remove response code
-
Finalize Monitor Creation
-
Click Create to add the monitor.
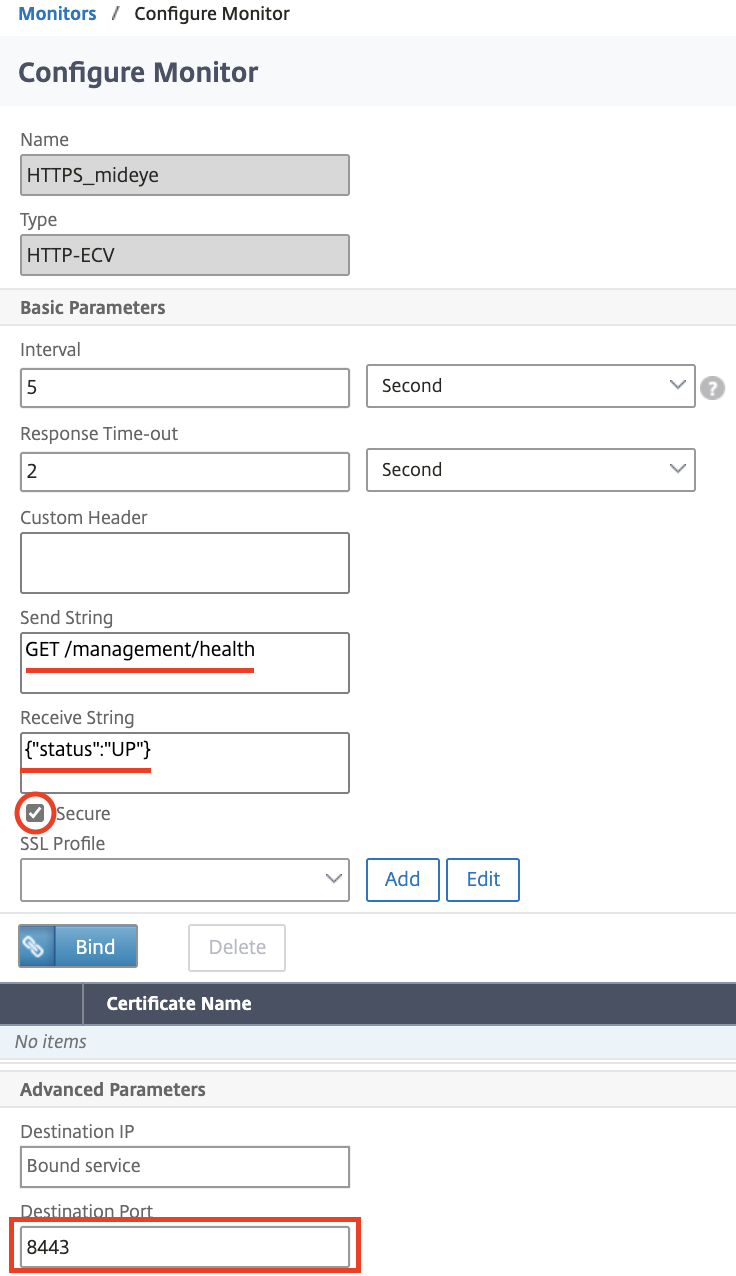
2. Monitor Mideye Server Health
Ensure the health and availability of the Mideye Server by configuring a health check:
-
Use the Health API
-
Mideye Server provides a Health API that can be accessed via an HTTPS check.
-
Refer to Citrix Documentation
-
For detailed instructions on monitoring SSL services, refer to the Citrix documentation for monitoring SSL services.
3. Bind a Monitor to a Load Balancing Service
Binding the created monitor to your load balancing services ensures continuous health checks and optimal traffic distribution.
-
Navigate to Load Balancing Services
-
In the NetScaler management console, go to Traffic Management → Load Balancing → Services.

-
Edit the Desired Service
-
Select the service you want to configure and click Edit.
-
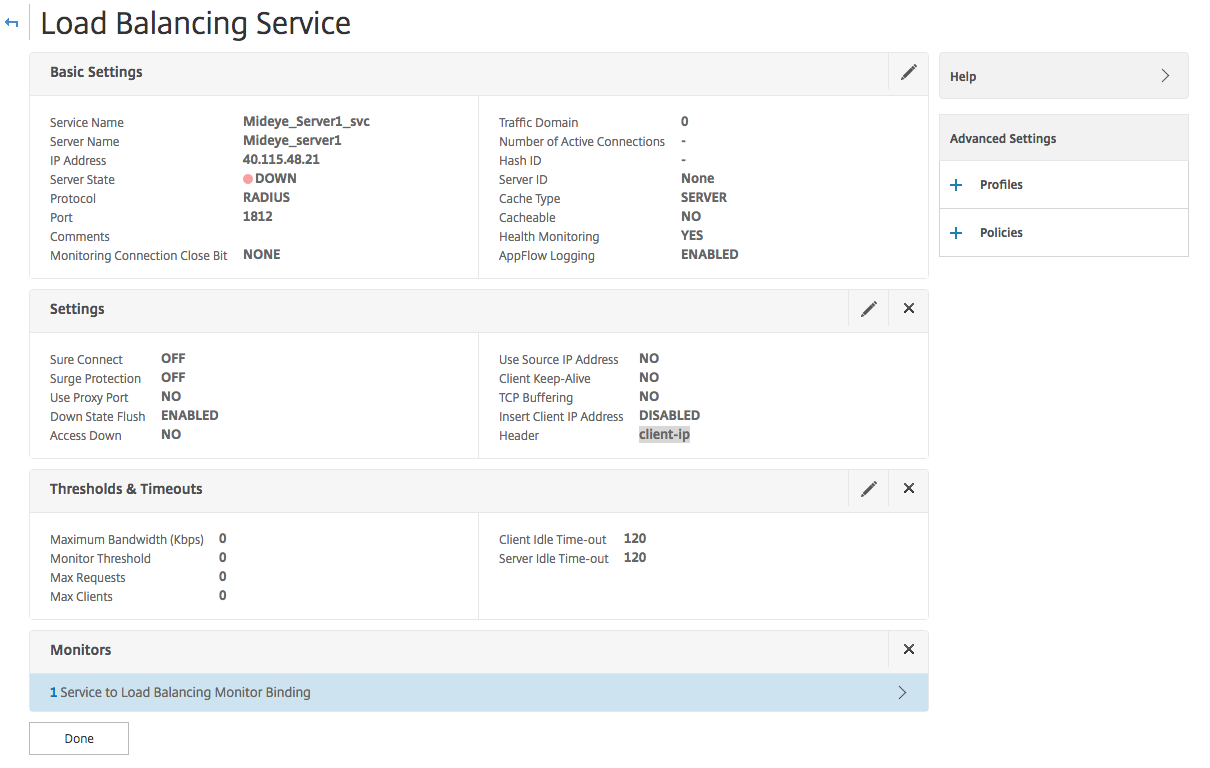
Add the Monitor to the Service
-
Scroll to the bottom of the service configuration page.
-
In the Monitor section, click Add.
-
Remove the Default Ping Monitor
-
Locate the default
pingmonitor binding. -
Click Remove to unbind the ping monitor.

-
Bind the
Mideye_RADIUSMonitor -
Select the
Mideye_RADIUSmonitor from the list. - Click Close to finalize the binding.
-
Click Done to save the changes.

-
Verify Monitor Status
-
Ensure that both service states are marked as UP, indicating that the monitors are active and RADIUS traffic is reaching the Mideye Server.

-
Check Monitor Logs on Mideye Server
-
Verify that the Mideye Server logs show entries similar to the following, indicating successful monitor interactions:
Creating a Virtual Server
Setting up a virtual server allows NetScaler to handle and distribute RADIUS traffic effectively.
-
Navigate to Virtual Servers
-
In the NetScaler management console, go to Traffic Management → Load Balancing → Virtual Servers.

-
Add a New Virtual Server
-
Click the Add button to create a new virtual server.
-
Configure the virtual server with the following settings:
- Name:
Mideye_LB_vsrv - Protocol:
RADIUS - IP Address Type:
IP IPAddress - IP Address: (Enter the desired IP address for the virtual server)
- Port:
1812

- Name:
-
Finalize Virtual Server Creation
-
Review the settings to ensure accuracy.
- Click Create to add the virtual server to the load balancing configuration.
7. Bind Services to the Virtual Server
To ensure that the virtual server correctly distributes RADIUS traffic to the Mideye Servers, follow these steps:
-
Navigate to Virtual Servers
- In the NetScaler management console, go to Traffic Management → Load Balancing → Virtual Servers.
-
Edit the Virtual Server
- Select the virtual server you wish to configure.
- Click on the Edit button.

-
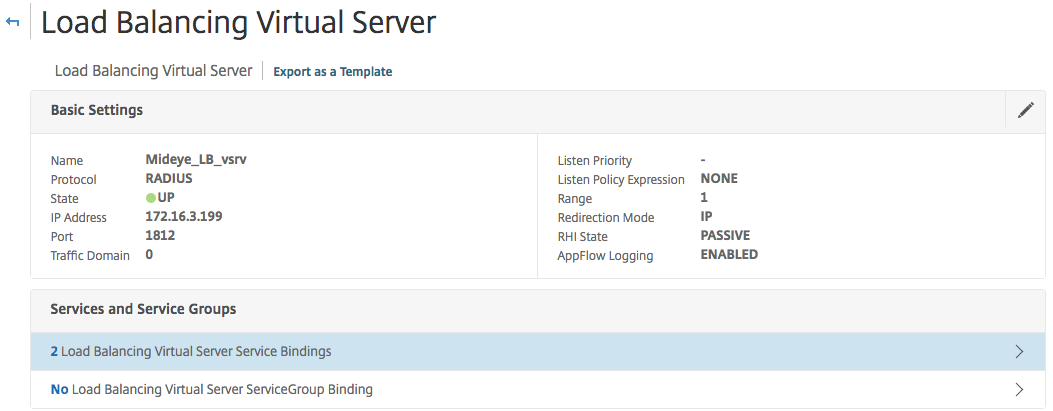
Access Service Binding
- Within the virtual server configuration page, navigate to Load Balancing Virtual Server Service Binding.
-
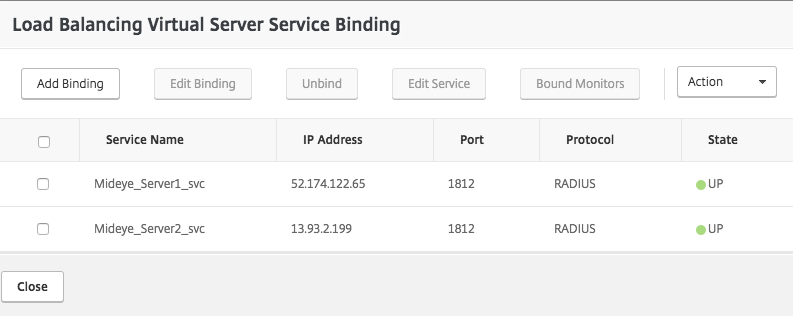
Bind Mideye Load Balancing Services
- Click Add to bind the Mideye Load Balancing services to the virtual server.
- From the list, select the two previously created Mideye Load Balancing services.
-
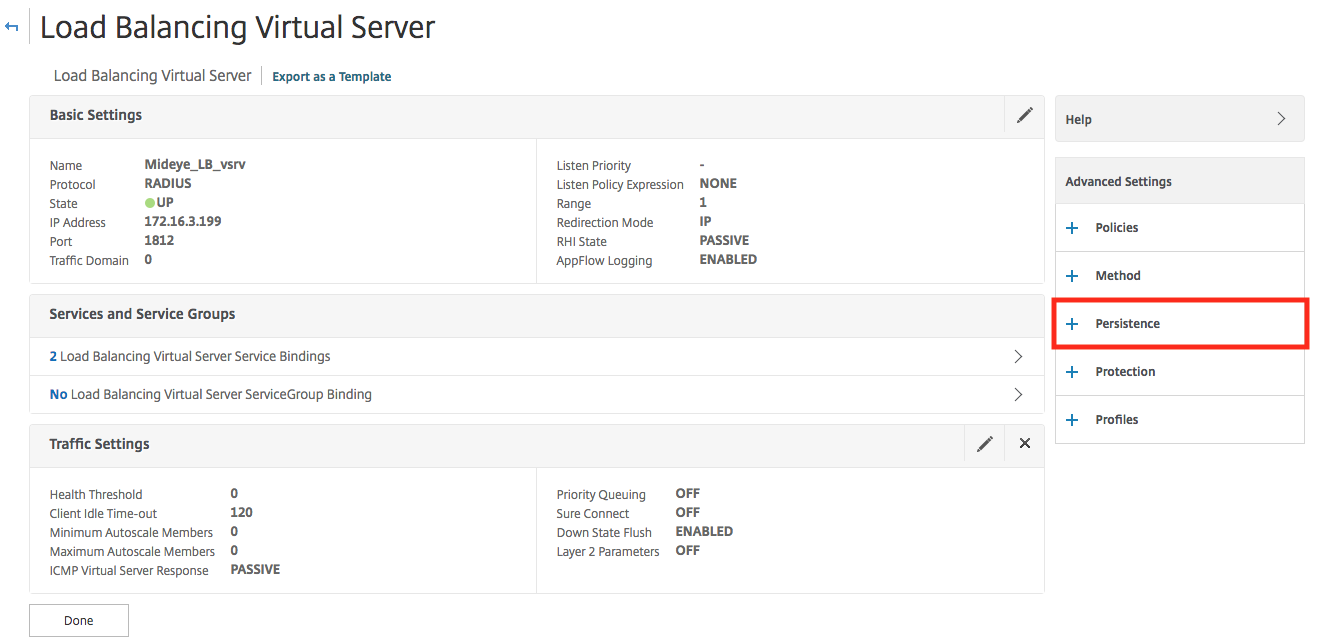
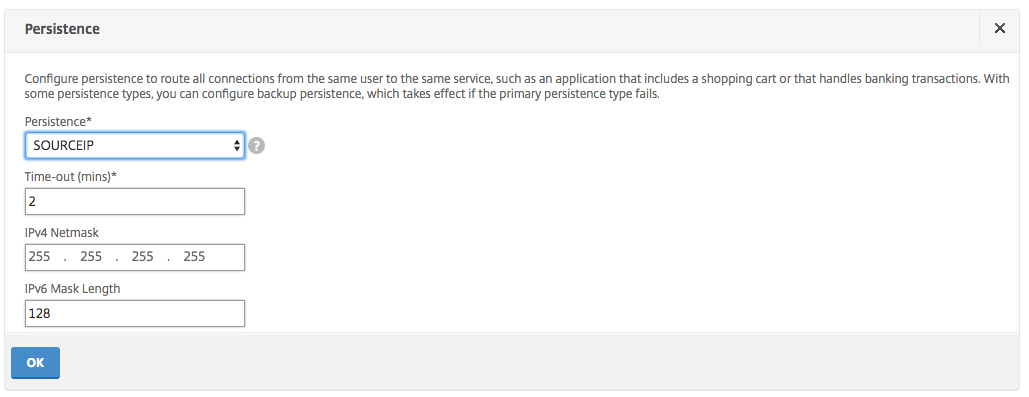
Configure Persistence Settings
To ensure consistent routing of each server request to the same Mideye Server, set up persistence based on the source IP address.
- Click on Persistence settings.
- Set the persistence type to SOURCEIP.
- Confirm the persistence rule:
-
Finalize the Binding
- Click OK and then Done to save your configuration.
- Refresh the Virtual Servers page.
- Ensure that the State and Services indicators are marked green, indicating active and properly bound services.
-
Verify Load Balancer Functionality
- Confirm that NetScaler is now listening on
172.16.3.199for RADIUS traffic. - NetScaler will monitor the Mideye Servers and forward traffic to the available ones.
- Confirm that NetScaler is now listening on